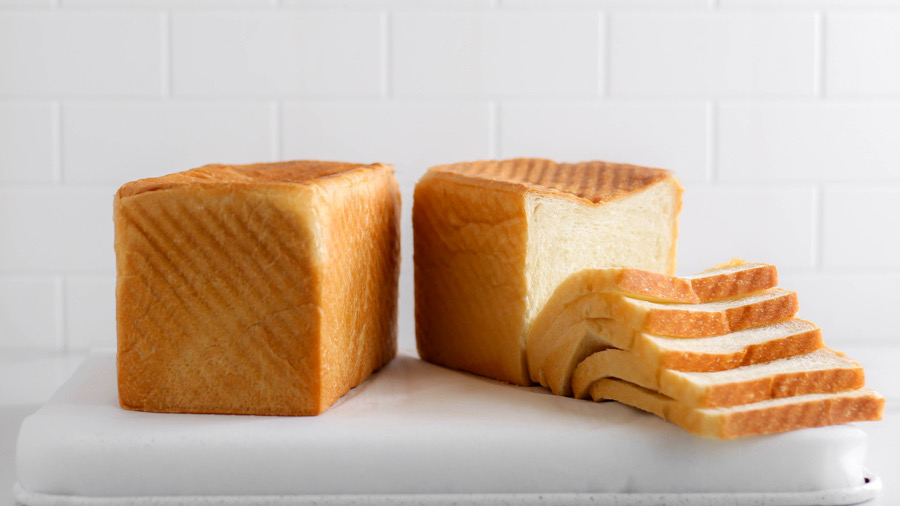
There’s something incredibly satisfying about the aroma of freshly baked bread wafting through the kitchen. Today, we’re making this very easy homemade sandwich bread. This homemade bread is soft, has a tender crumb and a hint of sweetness, this bread is perfect for the whole family and will elevate your sandwiches to a whole new level. With just a handful of ingredients and some simple steps, you’ll be able to enjoy the satisfying experience of baking your own bread and savoring the aroma that fills your kitchen. So, let’s roll up our sleeves, preheat the oven, and get ready to bake!

Ingredients and substitutions
Here’s everything you’ll need to make the perfect loaf plus subs!

- Water – is the main liquid component in the recipe, providing hydration to activate the yeast and help develop gluten in the dough. You can substitute with milk for a richer dough. Omit powdered milk if using liquid milk.
- Sugar – adds a touch of sweetness to the bread and also acts as food for the yeast during fermentation, aiding in the rising process. It also gives the bread a beautiful brown color. Substitute with alternative sweeteners like honey or maple syrup. Keep in mind that different sweeteners may slightly alter the flavor and texture of the bread.
- Yeast – is responsible for the bread’s leavening(rising). This recipe calls for active dry yeast but you can substitute with instant yeast/rapid rise yeast. Use the same amount of instant yeast, but you can skip the proofing step and directly mix it with the dry ingredients.
- Salt – enhances the flavor of the bread and also helps to regulate yeast activity, control fermentation, and strengthen the gluten structure.
- Bread Flour – Bread flour contains a higher protein content than all-purpose flour, making it ideal for bread baking. The protein (gluten) in bread flour gives the bread its structure and chewiness. If bread flour is not available, you can use all-purpose flour as a substitute. However, keep in mind that the bread may have a slightly different texture.
- Powdered milk – Adds richness to the dough. Also enhances the flavor and makes a softer bread. Can be Substituted with liquid milk by replacing the water with liquid milk. Use the same amount.
- Butter – adds richness, tenderness, and flavor to the bread. It also helps hydrate and prevents the bread from becoming too dry. Make sure butter is at room temperature. If you prefer a dairy-free option or don’t have butter on hand, you can substitute it with an equal amount of a non-dairy spread or vegetable oil. This substitution may affect the flavor and texture slightly.
- Oil – for dough and also to grease the loaf pans, preventing the dough from sticking. Adding a little oil to bread dough will keep it moist and hydrated days after baking.
Remember, substitutions can alter the final result to some extent, so it’s best to stick to the original recipe whenever possible for the best outcome.
Steps to make this easy sandwich bread

1. Activate the yeast: Dissolve the active dry yeast in warm water and sprinkle a pinch of sugar over it. Let it sit for about 5-10 minutes until the mixture becomes frothy.
2. Prepare the dough: In a large mixing bowl, combine bread flour, sugar, milk and salt. Add the activated yeast mixture and mix well until a rough dough forms.
3. Knead the dough: Knead for about 4 minutes, add the butter and knead until it becomes smooth, elastic, and no longer sticky.
4. First rise: Place the dough in a greased bowl, cover it with a clean kitchen towel or plastic wrap, and let it rise in a warm place for approximately 1-2 hours until it doubles in size.
5. Shape the dough: Once the dough has risen, gently punch it down to release the air. Transfer it back to a flat surface, divide and shape it into loaves by rolling it tightly from one end to the other.
6. Second rise: Place the shaped dough in a greased loaf pan, cover and let it rise for another 1-2 hours.
7. Preheat the oven: About 15 minutes before the second rise ends, preheat your oven to 350°F (175°C) to ensure it’s adequately heated when the dough is ready.
8. Bake the bread: Once the dough has risen, remove the cover and bake it in the preheated oven for approximately 25-30 minutes or until the top turns golden brown.
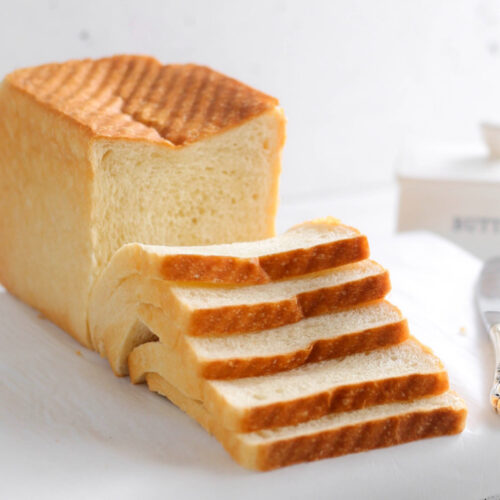
9. Cool and slice: remove from pan and transfer it to a wire rack to cool completely. Once cooled, slice the bread into desired thickness and enjoy your homemade sandwich bread!
Remember to follow any additional instructions or variations provided in the recipe for the best results.
Which yeast works best for homemade bread?

When it comes to baking bread, you have two popular options for yeast: active dry yeast and instant yeast. While both types of yeast can be used to leaven bread dough, the main difference between them is that active dry yeast has a larger granule and needs to be dissolved in water before using, while instant yeast has a finer texture and can be mixed right into dry ingredients. Here are some pros and cons.
| Pros | Cons | |
| Active dry yeast | * The slightly slower rise of active dry yeast enhances the flavor. Perfect for make ahead. * Has a longer shelf life compared to instant yeast. | * Slower rising time. * Needs to be dissolved. Because of the slightly large granules, active dry yeast need to be dissolved. |
| Instant Yeast | * Instant yeast works rapidly, resulting in faster rising times making it ideal for those who prefer shorter proofing periods. * Easy to use: Instant yeast dissolves quickly and you can simple add it directly without dissolving. | * Less flavor development: The faster fermentation process of instant yeast may result in slightly less complex flavors compared to bread made with active dry yeast. * Shorter shelf life: Instant yeast has a shorter shelf life compared to active dry yeast and may require refrigeration or freezing for longer-term storage. |
Ultimately, the choice between active dry yeast and instant yeast depends on personal preference, and the desired timeline for baking. Both types of yeast have their advantages and can yield delicious bread when used correctly.
Single Proof or Double Proof for bread?

The choice depends on your preference and time constraints. If you want a quick and straightforward process, go for a single proof.
A single proof involves shaping the dough right after mixing so Mix~Shape~Rise~Bake.
On the other hand, a double proof requires an additional rising stage. Mix~Rise~Deflate~Shape~Rise~Bake. The extra rise time allows the flavors to deepen, gluten strands to strengthen, and the bread to achieve a finer texture so you get a more pronounced flavor and elasticity.
Whether you choose a single proof or a double proof for your sandwich bread, both methods can lead to delicious results. Shhh…Here’s a secret, most times I only do a single proof.
How to store homemade bread

This homemade bread will last for about 4-5 days if it even makes it that far!🤭

A couple of tips to keep it fresh for longer:
- Wrap the bread tightly in plastic wrap, aluminum foil, or store in airtight containers.
- Store at room temperature for a few days or freeze for longer storage.
- Freeze for longer storage: If you want to store the bread for an extended period, freezing is the best option. Slice the bread before freezing, so you can easily thaw individual portions.
- Thaw frozen bread at room temperature, toast, or reheat in the oven.
Equipment
- 1 Stand mixer Optional
Ingredients
- 354 g water 1 ½ cup
- 7 g active dry yeast 2 ¼ teaspoons (see note 1)
- 70 g sugar 1/4 cup + 2 tbs
- 650 g Bread flour about 5 cups
- 32 g powdered milk ¼ cup
- 9 g salt 1 1/2 teaspoon
- 60 g butter 5 tablespoon (room temperature)
- 13 g 1 tablespoon oil
Instructions
- In a mixing bowl, combine yeast with slightly warm water around 100 – 110°F/43°C and 1 tablespoon of sugar. Add the yeast, mix and allow to sit for about 5-10 minutes until it becomes frothy. This indicates that the yeast is active and ready to be used. See note 1
- When the yeast is frothy, add the remaining sugar, milk, salt, and bread flour. Mix the dough until it forms a dough ball.
- Transfer the dough to a lightly floured surface and knead for about 8-10 minutes until it becomes smooth and elastic. Alternatively, if using a stand mixer, mix with the dough hook attachment and for approximately 5-7 minutes.
- Add the oil and softened butter to the dough and continue kneading until it is fully incorporated. If kneading by hands, see note 2 for speed times.
Rise 1
- Cover the bowl with a clean kitchen towel or plastic wrap and let the dough rise in a warm, draft-free area for about 1-2 hours, or until it doubles in size.
- Once the dough has risen, gently deflate it and divide it into two equal portions. Shape each portion into a loaf by rolling it tightly and tucking the edges underneath. Place the loaves seam-side down into greased loaf pans. See note 3
Rise 2
- Cover the loaf pans with a kitchen towel and let the dough rise for another 45 minutes to 1 hour, or until it reaches just above the rim of the pans.
- When the dough has risen to about 60% in the pan, start to preheat your oven to 350°F (175°C).
- Once the loaves have risen to about 80 percent, place them in the preheated oven and bake for 25-30 minutes, or until they turn golden brown. If baking without cover and the tops start to brown too quickly, cover with aluminum foil.
- Remove the loaves from the oven. Remove from pan and tansfer the to a wire rack to cool completely before slicing. Once cooled, store the bread in an airtight container to maintain freshness
Notes
- The water used to proof the yeast should be warm, around 100- 109°F (37-43°C). If the water is too hot, it can kill the yeast, and if it’s too cold, the yeast may not proof on time. Measure the temperature of the water by inserting a clean finer in the bowl of water. Water should be around the same temperature as your fingers(blood temperature) or you can use a food thermometer. * Add a small amount of sugar to provide food for the yeast. Allow the yeast mixture to sit undisturbed for 5-10 minutes to observe foam and froth formation. * If there is no foam or activity after 10 minutes, it may indicate that the yeast is inactive or expired. In such cases, it’s best to discard the yeast and start with fresh yeast to ensure a successful rise and a well-risen loaf of bread.
- You can knead the dough by hand. It will require some arm work but it will be worth it. Knead for 10-15 minutes. If using a stand mixer, mix on speed 4 for 8 minutes or speed 6 for 6 minutes.
- Pan size used 4D x 8W x 4H (inches)pans
- The proof time will depend on your environment and time of baking. Colder environments usually require a longer proof time than warmer climates.
- To get even loaves, Weigh the entire dough using a kitchen scale and note the total weight. Divide the total weight by 2 to calculate the desired weight for each portion. For example, if the total weight of the dough is 1,200 grams, half of that would be 600 grams.Divide the dough in two and weigh until you get the correct figure for each dough.
- In a covered pan, the bread will be ready in 25 minutes but if you want a browner loaf, leave it for up to 30 minutes.


You are simply amazing, been following your channel for long and learnt alot
More strength ma’am ❣️
I appreciate you!
Thank you very much for this,it is well broken down and understand able.
I’m about to try this out without a mixer I hope it comes out well
This recipe is a keeper! I will be making more of it for sure. Thank you kikifoodies.
Thanks Kiki! Please do you have a link for the bread pans?
I have it on my Amazon store front. Here’s the link: https://www.amazon.com/shop/kikifoodies
Hi Kiki I’ve enjoyed watching your video and reading your blog . You’re a doing great . Could you please let me know how to get a blog on my channel .
Regards
You are doing a great job. Your video is fully understood and easy to use, thanks
For baking a single loaf of bread I require to half all the ingredients including the yeast? Please advise. Thanks.
Yes. Just half everything.
I definitely plan to try this, easy and straightforward
Hey kiki,I’m doing a baking learnership and after seeing your video, I just got more interest and I’m loving the art of flour.. thank you
You are welcome.
Good morning. I have watched your video
on YouTube and its quite impressive. Please I want to set up a small bread baking factory in Abakaliki Ebonyi State and I need someone to train me and help me to formulate the recipe for the bread.
Hello Kiki, thanks for this and all you do. I really appreciate this step by step bread recipe. God bless you abundantly.
You’re very welcome
Miss Kiki, out of the recipes I tried, yours is the best, I will be making yours from now on. I don’t have a stand alone mixer, I just enjoying hand kneading my dough until I can’t then I’ll get the stand alone mixer or put it in the food processor. I made sure I saved it for next time. I made two loaves, put one in the freezer.
Thank you so very much for such an awesome recipe. By the way do you have any delicious vegetarian recipes?
That’s awesome! No vegetarian recipes at the moment but I’ll looking into adding some.
This bread is amazing and you made it easy to follow. Hoping to see different flavor breads and cinnamon rolls, bread sticks a lot more from you.
Thank you so much.
Thank you Kiki. Amazing recipie. My bread came out sumptuous and yummy. I even added sardines to mine.
Hi Kiki, I love your bread recipe. It’s simple yet detailed. Thank you so much. Please what is the exact amount of water to use for this recipe?
Hi. It’s 354ml or 354g or 1 1/3 cup